The replacement looks right in the store. At home, its front edge hangs over the bowl, the hinges barely reach, and the lid touches the tank. The problem is usually not the color or material. It is a missing measurement.
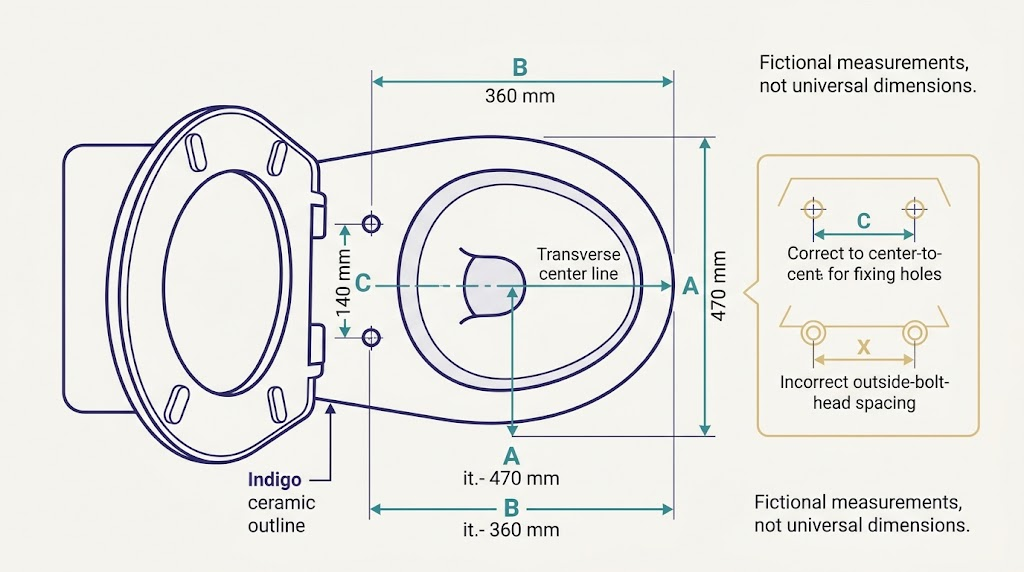
To measure a toilet seat for a replacement, record the bowl length from the center line of the fixing holes to the front edge, the widest outside width, and the distance between the fixing-hole centers. Then compare the bowl shape and hinge arrangement with the manufacturer’s drawing. Measure the toilet itself, not just a loose or badly fitted old seat.
Your shopping note needs more than one number
A label such as “elongated” narrows the search, but it is not a complete compatibility check. Two seats can have similar overall lengths yet use different mounting systems. A decorative square-front bowl may need a seat designed for that particular shape.
Start a note on your phone before measuring. Give each number a name and a unit. A note saying “18.5, 14, 5.5” is easy to misunderstand later. “Length from bolt centers: 18.5 in” is much more useful.
Take a photograph from directly above and another showing the hinges. Include the toilet’s brand and model number when available. Those details help a supplier check a replacement, but they do not replace the measurements.
|
Record |
Where to measure |
Why it matters |
|---|---|---|
|
Bowl length |
Fixing-hole center line to front outside edge |
Matches the seat’s reach |
|
Bowl width |
Across the widest outside part |
Checks support and overhang |
|
Hole spacing |
Center of one fixing hole to center of the other |
Checks hinge compatibility |
|
Shape and mounting |
Photograph and product description |
Finds mismatches numbers can miss |
First, measure the length from the right starting line
Raise the seat and lid so you can see the bowl and mounting area. Clean and dry the surfaces before placing a tape on them. Use gloves when appropriate and wash your hands afterward.
Find the two holes or bolts that attach the seat. Imagine a straight line joining their centers. The center of that line is your starting point. Run the tape forward along the middle of the bowl to its outer front edge.
Do not start at the back edge of the ceramic tank or at the rear of the lid. Either choice adds a distance that is not part of the usual seat-length measurement. Also avoid following the curve around the bowl; you want a straight front-to-back distance.
Read the tape without stretching it or letting it bow. Record the result in inches or millimeters, then repeat the measurement. A second reading that differs noticeably means you should check the endpoints before shopping.
For many common US bowls, manufacturers distinguish roughly 16.5-inch round seats from roughly 18.5-inch elongated seats. Bemis explains these common shape categories. Treat them as useful category clues, not worldwide dimensions that every toilet must follow.
Next, check width and fixing-hole spacing
Measure the widest part of the bowl from one outside edge to the other. Keep the tape across the bowl, rather than at a diagonal. This is different from measuring the opening in the middle.
A seat needs to rest correctly on the bowl through its intended support points. A similar length does not make a much narrower or differently shaped seat suitable. Compare the supplier’s full outline, not only the first measurement in its listing.
For the fixing-hole spacing, measure center to center. Measuring from the outside of one bolt head to the outside of the other includes the width of the bolt heads and gives the wrong value. Caps can also be wider than the holes underneath them.
Some hinges adjust across a range. Check that your measured spacing falls within that stated range, rather than assuming adjustment means any spacing will work. If the hole centers are hidden, consult the toilet or seat instructions before removing covers. Do not force an unfamiliar mechanism simply to obtain a number.
The comparison that catches an expensive mistake
Imagine your measurements are 470 mm long, 360 mm wide, with fixing holes 140 mm apart. These are fictional readings, not a universal toilet size.
Seat A lists a compatible bowl length range that includes 470 mm and adjustable fixing centers that include 140 mm. Its outline also matches your bowl. Seat B is advertised as a similar overall size, but its fixed hinges are 155 mm apart.
Seat B is not rescued by being close in length. Its mounting measurement is the problem. Seat A is the stronger candidate, but you still need to check its mounting type, support arrangement, and clearance.
This comparison works best when you match like with like. A product’s total plastic depth may include the hinges, while your bowl measurement starts at the fixing-hole center line. Look for a labeled diagram explaining the seller’s dimensions. Ask for clarification when a listing provides only an unlabeled length and width.
Use the NavigationHubs Unit Converter when the bowl measurements and product drawing use different length units. Convert each measurement separately and keep the original readings in your note. The tool converts units; it does not identify compatible seats.
Check what happens behind the hinges
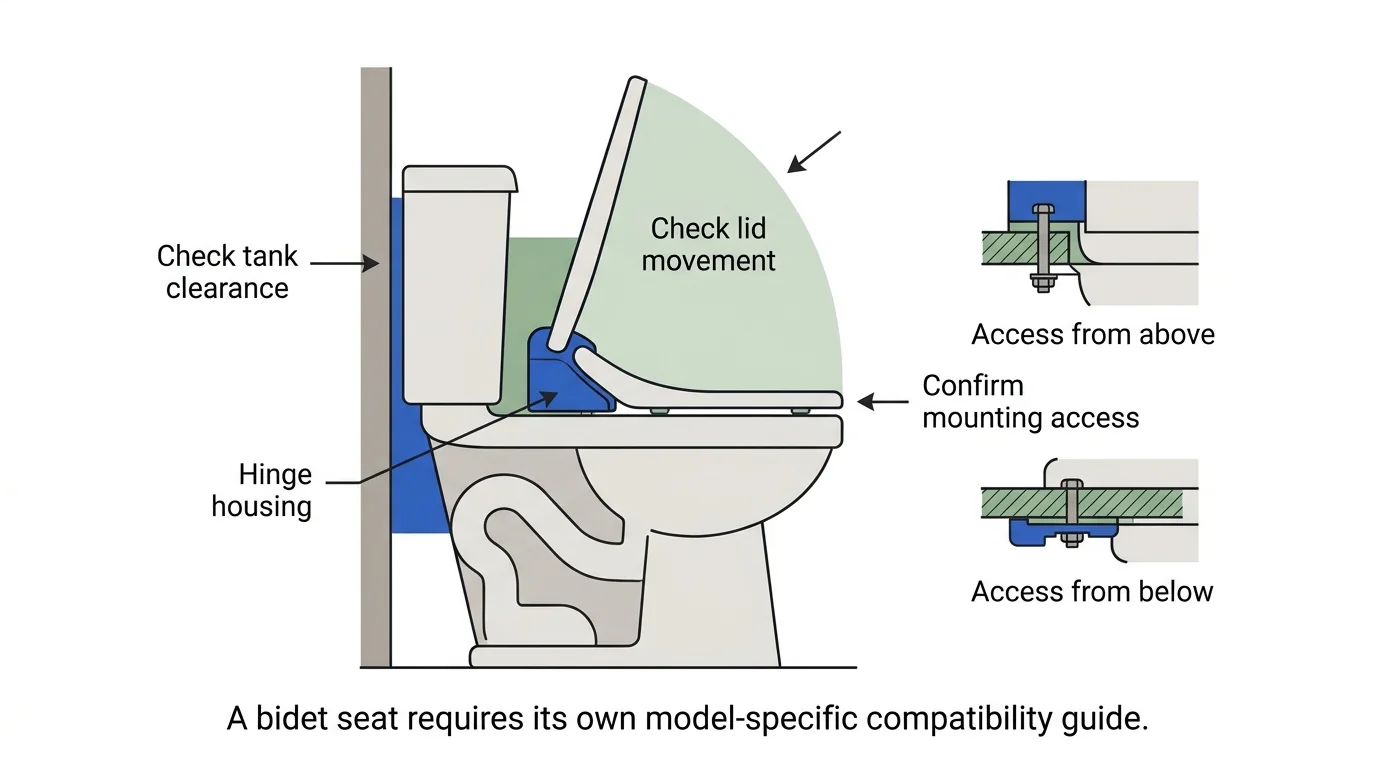
Before ordering, look at the space between the mounting area and the tank or wall. A bulky hinge housing, soft-close mechanism, or electronic bidet seat may need more room than a simple replacement seat.
Open the existing lid and notice whether it already rubs against anything. Photograph the rear area from the side. For a bidet seat, use the manufacturer’s specific compatibility guide, because a standard toilet-seat measurement alone does not settle questions about rear clearance or bowl design.
Also identify whether the fixings are reached from above or below. A concealed underside can change which mounting kit is usable. The important question is not whether you prefer one mounting system; it is whether the supplied hardware is suitable for your toilet.
The manufacturer’s seat-measuring guide is a useful starting point, but the instructions for the exact replacement model take priority over a general article.
Round, elongated, D-shaped, or something specific?
Look at the front edge and sides, not only the center opening. A round-front bowl has a different outline from a longer oval bowl. Some bowls have straighter sides or a distinctly squared front. Brand-specific designs can be less forgiving than familiar round and elongated shapes.
Do not use the old seat as the only template when it slides around, overhangs, or never fitted properly. That simply transfers the old mistake to a new purchase. The ceramic bowl and its fixing points provide the better reference.
When you cannot confidently name the shape, send the supplier the top-view photograph, the three labeled measurements, and the model number. Ask whether the proposed seat is compatible with that exact information. A clear question is more useful than asking whether a seat is “standard.”
A final check before you click Buy
Read your note against the product drawing once more. Confirm that both use the same units, that the length starts at the same reference line, and that the fixing range includes your measurement. Check the shape, mounting access, and clearance behind the hinges.
Keep the product details and your measurements together until the replacement has been checked. Review the seller’s return conditions before opening packaging or fitting the seat, especially for hygiene-sensitive products.
The goal is not to find the seat with the nearest-looking photograph. It is to match the bowl’s dimensions and shape to a clearly specified replacement. Three careful measurements and one good comparison usually give you a much stronger buying decision than the word “universal” on a package.