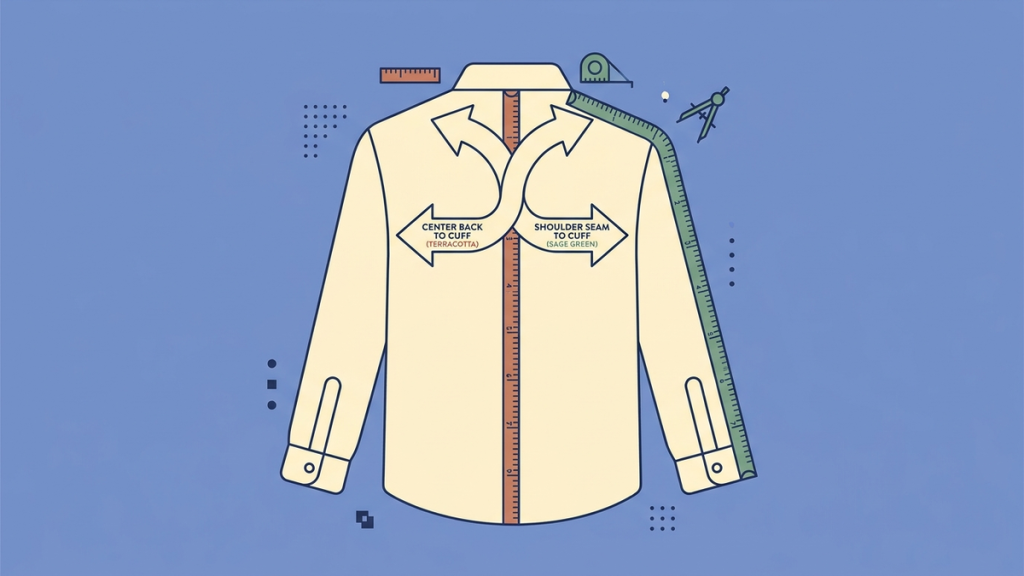
A sleeve measurement can start at the center back of the neck or at the shoulder seam, depending on the brand and whether you are measuring a body or a garment. Those methods do not produce interchangeable numbers.
Before measuring, open the size guide for the shirt you are considering. Match its starting point, tape path, and finishing point. The most accurate number is not useful if it was taken with the wrong method.
Two measurements that can both be correct
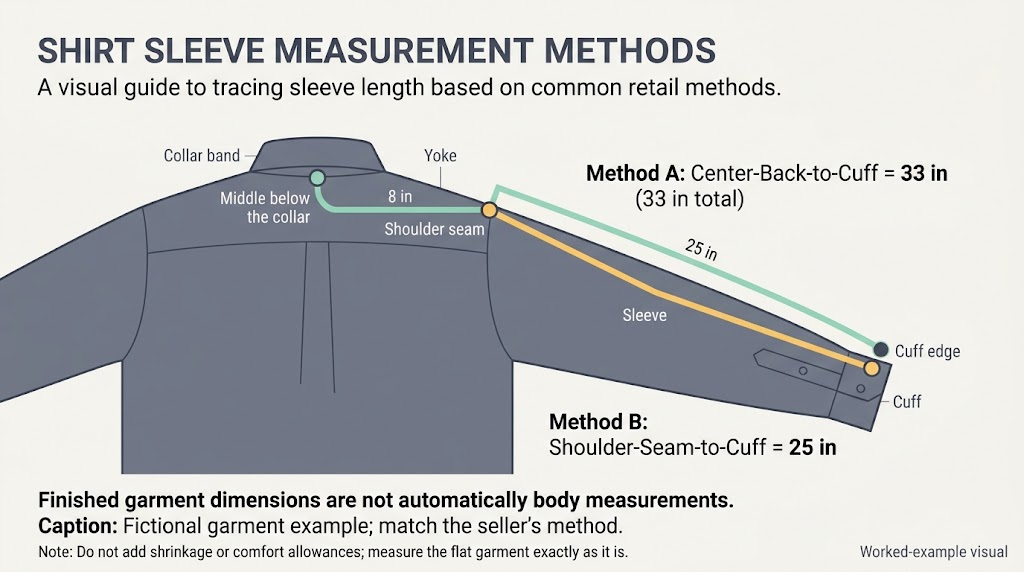
Suppose a shirt measures 25 inches from shoulder seam to cuff. The distance from the center back below the collar to that shoulder seam is another 8 inches.
The shoulder-to-cuff measurement is 25 inches. The center-back-to-cuff measurement is 33 inches. Nobody has necessarily measured incorrectly; the second method includes an additional section across the back.
|
Method |
Starting point |
Path |
Endpoint |
|---|---|---|---|
|
Center-back body measurement |
Center back of neck |
Over shoulder and along arm |
Guide’s specified wrist/cuff point |
|
Center-back garment measurement |
Center back below collar |
Across yoke, then along sleeve |
End of cuff |
|
Shoulder-seam garment measurement |
Shoulder seam |
Along sleeve |
End of cuff |
Do not use an arm-only measurement against a chart that expects the center-back method. Read the diagram, not just the phrase “sleeve length.”
Measuring your body for a dress shirt
Use a flexible tape and, ideally, a helper. Stand comfortably with your shoulders relaxed. Follow the brand’s arm-position instructions; many center-back methods use a slightly bent elbow so the tape follows the arm’s natural path.
Start at the center back of the neck. Run the tape over the shoulder, then down the arm to the point shown in the guide. Keep the tape in contact without pulling it tight or taking a diagonal shortcut.
The Charles Tyrwhitt shirt-measuring guide provides a brand-specific reference for this type of measurement. Match its instructions when ordering from that brand rather than borrowing a different retailer’s method halfway through.
Read the tape without changing your posture. Measure again, and check the other arm if you are ordering a tailored garment or notice a meaningful difference. Record each result and the method instead of assuming one universal number must fit every shirt.
Where should the cuff end?
The measurement guide should show the intended endpoint. Your preferred cuff position and how the shirt sits under a jacket are fit choices, not reasons to move the tape’s start point.
If you are working with a tailor, provide the raw measurement and explain how you want the finished cuff to sit. Do not add an unexplained inch for comfort or shrinkage. The maker may already build that allowance into its pattern.
Measuring a shirt that already fits
An existing garment is a useful reference when you want to reproduce its finished dimensions. Button the shirt and cuffs, lay it flat with the back facing upward, and smooth the fabric without stretching it.
For a center-back garment measurement, start just below the collar band at the middle of the back. Measure across to the yoke or shoulder seam, then follow the sleeve to the cuff edge. Keep the tape at the direction change so you do not accidentally cut across the corner.
Proper Cloth’s sleeve-measuring instructions use this center-back route and specifically tell customers not to add shrinkage allowance themselves. That is a useful example of why a supplier’s ordering instructions take priority over generic advice.
If the requested measurement is shoulder seam to cuff instead, start at the seam and record only that portion. Name the method in your note.
Do not compare every sleeve construction the same way
A raglan sleeve does not have the same conventional shoulder seam as a set-in sleeve. A dropped-shoulder shirt places its seam farther down the arm. Those designs make a shoulder-to-cuff comparison less straightforward.
Use the maker’s measurement points or compare two garments of similar construction. A shorter sleeve measured from a dropped shoulder may still reach the same wrist position when worn.
Why a sleeve can measure right and still fit wrong
Shoulder width affects where the sleeve begins on your body. A very wide shoulder can move the sleeve farther down your arm. A tight upper sleeve can restrict movement even when its measured length is correct. Cuff fit can also change how the sleeve rests at the wrist.
This means sleeve length should be reviewed alongside the rest of the shirt’s fit. Do not keep adding length to compensate for an incorrectly positioned shoulder or an overly tight sleeve.
For a meaningful comparison, wear the reference shirt, move your arms naturally, and note what you are trying to change. “The cuff is fine while standing but pulls back when reaching” is a more useful observation than “Make everything longer.”
Record inches and centimeters without rounding too early
For the 33-inch center-back example:
33 x 2.54 = 83.82 cm
You might record it as 33 in, or 83.8 cm when one decimal place is appropriate. Keep the original reading and the measurement method together.
The NavigationHubs Unit Converter changes the unit of a measured length. It does not translate a shoulder-seam measurement into a center-back measurement, choose a shirt size, or add tailoring allowances.
Send a measurement note, not just a size
A complete note could read: “Existing shirt, center back below collar to cuff, following yoke and sleeve; 33 in; measured flat without stretching; cuff included.”
For a body measurement, change the description to the brand’s body method and specify the endpoint. Keep any requested alteration separate: “Would like the finished cuff slightly lower” is a preference to discuss, not a hidden adjustment to the number.
Once the method is labeled, you can compare measurements confidently instead of wondering why two supposedly accurate sleeve lengths differ by several inches.