A ribbon around a jar and a straight ruler across its lid are measuring different things. The ribbon measures the distance around. The ruler measures the distance across. For a circle, the two readings are connected by a simple rule: circumference equals pi times diameter.
You can therefore measure circumference in two ways. Wrap a flexible tape around the object and read the distance directly, or measure a circular diameter and multiply it by pi. The direct method works for many noncircular outlines too, but the circle formula does not.
Choose the route that matches the object
Use a flexible tape when you can reach all the way around the object. This is useful for a cylindrical container, a round table edge, or a measurement around an irregular shape. A nonstretch strip of paper or string can work when a tape is unavailable.
Use the diameter method when the object is genuinely circular and a straight measurement is easier. A flat circular lid is a good example. Measuring across it can be simpler than balancing a tape along its narrow edge.
For an oval basket, an uneven tree trunk, or a soft item that changes shape when squeezed, do not assume one width gives the circumference. Measure the actual outline at the location that matters. In those situations, “distance around” or “perimeter” may describe your result more precisely.
|
Your situation |
Useful method |
Main thing to watch |
|---|---|---|
|
Round lid with a clear center |
Diameter times pi |
Measure through the center |
|
Smooth cylindrical jar |
Flexible tape around it |
Keep the tape level |
|
Irregular outline |
Tape, string, or paper strip |
Follow the intended path |
|
Inaccessible circular edge |
Diameter or radius calculation |
Confirm the object is circular |
Route one: wrap, mark, and read
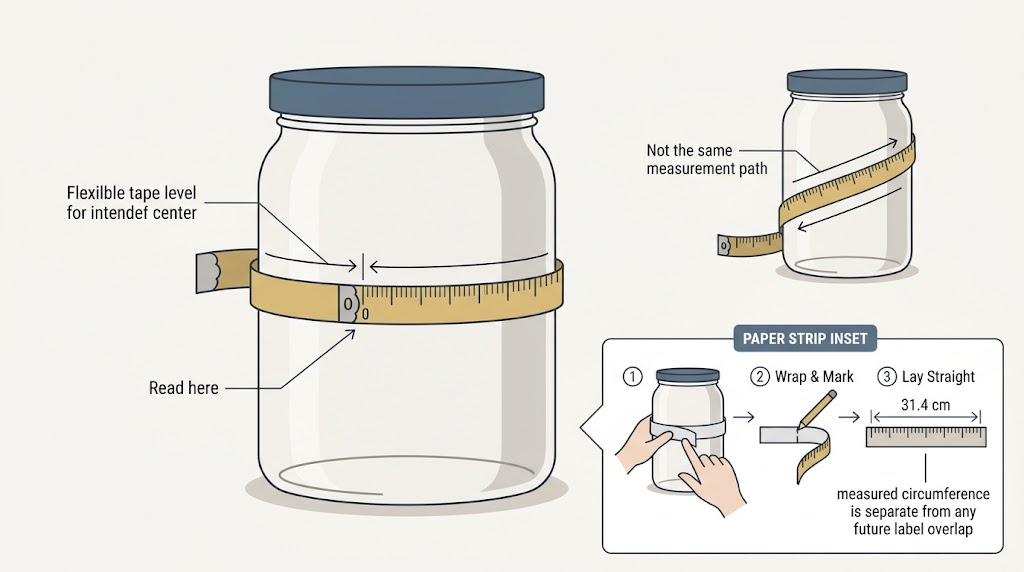
Put the tape around the object at the exact height where you need the measurement. For a jar label, measure where the label will sit, not automatically at the widest part or around the lid. A tapered jar can have different circumferences at different heights.
Bring the tape’s zero mark around to meet the scale. Keep the tape in one plane, without twisting it or letting it climb diagonally. It should touch the surface without compressing it. Read the value where the zero mark meets the scale.
Take the tape off and measure again. Repeating the process is more useful than staring at the same reading, because it reveals whether the position or tension changes the result. If your readings are 31.2 cm and 31.8 cm, check the setup before averaging them. The difference may be a slanted tape, not random measurement noise.
Record what you measured as well as the number. “Jar circumference at label center: 31.4 cm” is a reproducible note. “31.4” alone is not.
Using string without introducing a new error
Choose string that does not stretch easily. Wrap it once around the intended path and mark where it completes the loop. Remove it, lay it straight alongside a ruler, and measure between the starting point and the mark.
Do not pull elastic cord tight and then measure it relaxed. The two lengths will differ. Avoid tying a bulky knot at the starting point, because you may accidentally include part of the knot in the reading. A small mark or piece of tape is usually easier to interpret.
A paper strip is often convenient for a small smooth object because its width makes twisting easier to notice. However, thick paper can sit slightly outside a tight curve. For close-fitting work, use a measuring method appropriate to the required tolerance rather than treating any improvised strip as exact.
Route two: turn a diameter into circumference
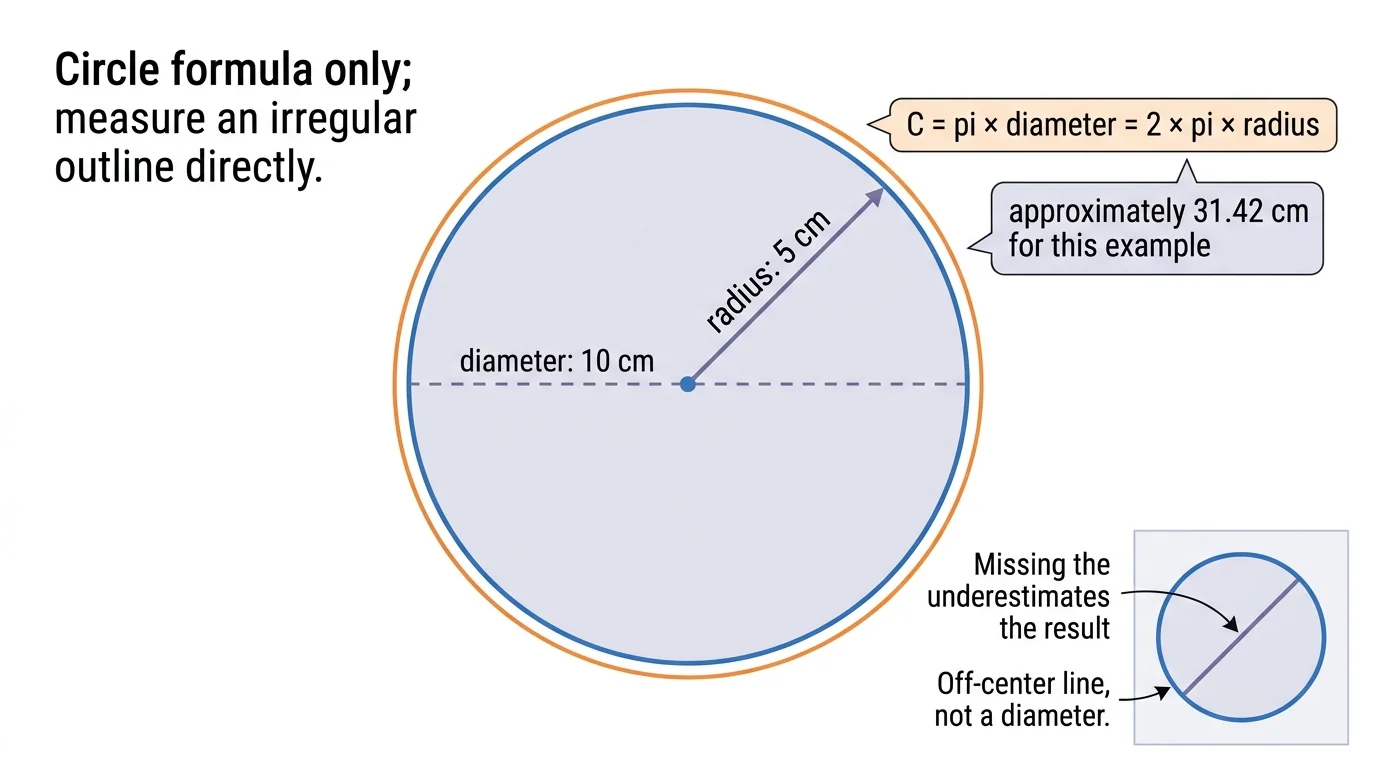
The diameter is a straight line across a circle through its center. It is twice the radius. The circumference formula is:
Circumference = pi x diameter
When you know the radius instead, use:
Circumference = 2 x pi x radius
OpenStax explains the relationship between a circle’s radius, diameter, and circumference. For calculation, use your calculator’s pi value or 3.14159 when entering the factor manually. Round the final result to a useful precision.
Suppose a circular lid has a diameter of 10 cm. Its calculated circumference is 10 x pi, or approximately 31.42 cm. A radius of 5 cm produces the same result: 2 x pi x 5.
Now try a diameter of 7.5 inches. Multiplying 7.5 by pi gives approximately 23.56 inches. Because the input is a length in inches, the output is also a length in inches, not square inches. Square units belong to area, which answers a different question.
How to find the center without guessing blindly
Move a ruler across a circular opening while keeping it straight. The widest straight span is the diameter. A line that misses the center is a chord and is shorter, so it produces an underestimated circumference.
For a flat circular object, you can measure in two directions at right angles as a check. Noticeably different readings suggest that the object is not circular, your endpoints are inconsistent, or the center was missed. Do not automatically average two widths and call the result a diameter of a perfect circle.
A jar-label example with the allowance kept separate
Imagine that you want to make a paper label for a cylindrical jar. A direct tape reading is 25.1 cm. A diameter reading of 8.0 cm gives 8.0 x pi, approximately 25.13 cm. The methods agree closely enough for a rough craft check, given the measurements used.
The label may need an overlap for adhesive. That is a design allowance, not part of the circumference. If you choose a 1 cm overlap, your planned label length becomes about 26.1 cm. Write both values down so you do not later mistake the cut length for the jar measurement.
The same separation matters for fitting a band or ordering a custom cover. First establish the measured distance. Then apply any allowance required by the maker. A supplier may ask for the actual circumference and add its own allowance; adding yours as well can create a double adjustment.
Why the two methods sometimes disagree
A small error in diameter becomes a larger error in calculated circumference. For example, a diameter error of 2 mm changes the result by about 6.28 mm, because the error is also multiplied by pi.
A wraparound tape has different possible errors: uneven tension, a diagonal path, a hidden gap, or reading from the metal end rather than the scale’s zero. Neither method is automatically perfect. The useful method is the one you can apply consistently to the object.
For an oval object, the disagreement may be telling you something important about the shape. Measuring one diameter-like width and multiplying by pi cannot reproduce the perimeter of every oval. Use a direct measurement or a formula that actually fits the geometry.
Units, rounding, and a useful measurement record
Keep your calculation in one unit system until the end. A 12 cm diameter gives a circumference in centimeters. Do not multiply by pi and then label the result inches. The NavigationHubs Unit Converter can convert the completed length measurement when you need another unit.
The converter does not decide whether the object is circular or calculate circumference from a diameter. Those are separate steps. Converting a rough reading to many decimal places also does not make the original measurement more precise.
A good record includes the object, the measurement path, the method, the original reading, the calculated result when relevant, and any separate allowance. For a simple home project, that can be one sentence. For repeated work, use the same fields each time. You will know not only the distance around the object, but how you obtained it.